
How to Fix Suppressed Listings on Amazon: A Step‑by‑Step Guide
When a listing drops off the buy box, your sales can melt away in hours.
You’ve probably seen the dreaded “Suppressed” badge flash on your Amazon dashboard and felt the panic rise. It means the product isn’t visible to shoppers because Amazon has found a rule break or missing data.
Fixing it isn’t magic. It’s a repeatable process: check the health alert, correct the missing or wrong fields, and tell Amazon you’ve fixed the issue. Do it fast, or the loss compounds.
First, open the “Account Health” page and note the exact reason – missing bullet points, illegal claim, or a required certification. Next, pull the ASIN into your product feed and update the field that triggered the alert. If the problem is a compliance document, upload the latest PDF through the “Compliance” tab. Finally, use the “Submit Appeal” button and include a short note that the data is now correct.
For catalogues with hundreds of SKUs, a manual grind will kill you. That’s why many teams read Amazon Compliance at Scale: How to Manage 100+ Flagged … to learn a triage system that lets you batch fix the most urgent alerts first.
Even if you’re not selling video gear, you might find this guide Everything You Need to Know About 360 Video Booth Rental useful for understanding how detailed product specs can affect compliance.
Start today by pulling a list of all suppressed ASINs, fixing the top three reasons, and filing the appeals. You’ll see visibility climb back within a day or two. Keep the spreadsheet updated each week to stay ahead of new alerts.
Step 1: Identify the Suppressed Listing Reason
When Amazon flags a product, the first thing you need is the exact reason. Without that, you’re guessing and wasting time.
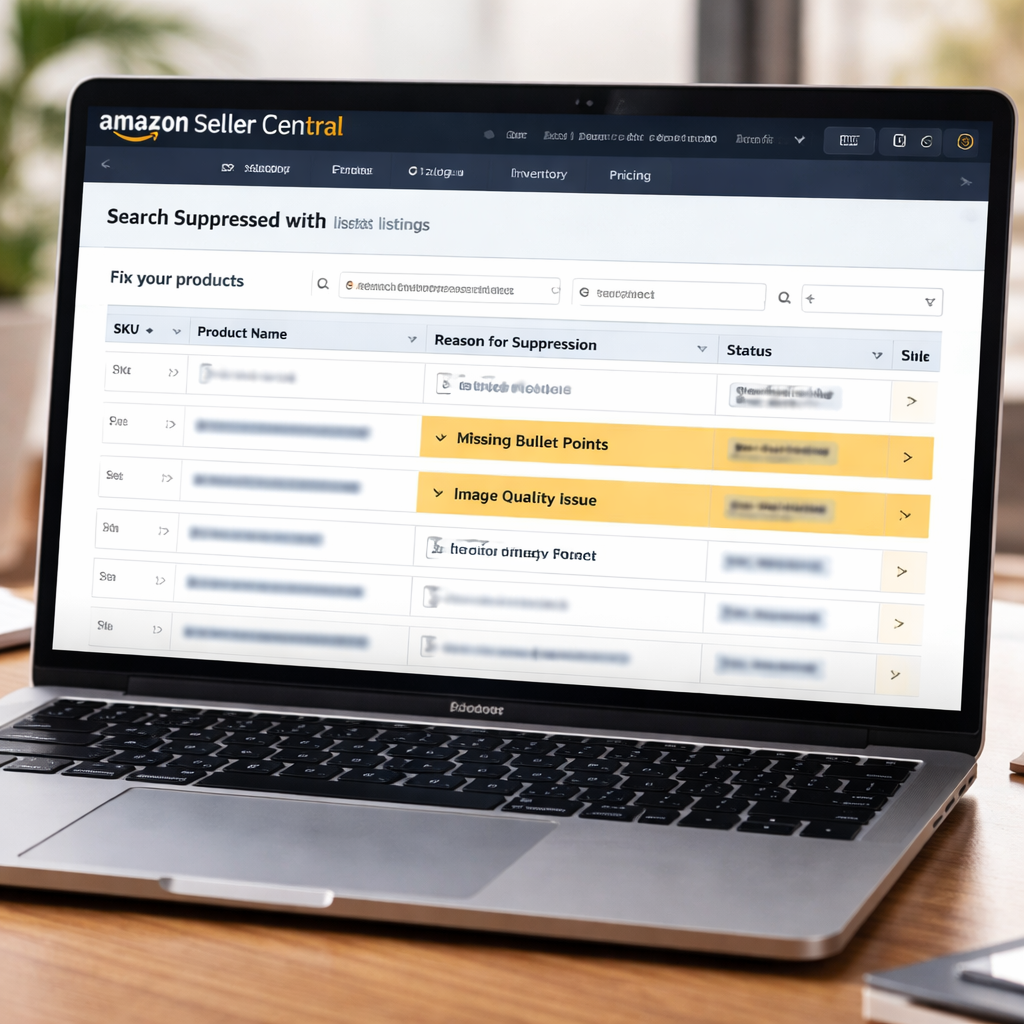
Open Seller Central, head to Account Health → Fix Your Products. Switch the view to “Search Suppressed” and download the report. The file lists each ASIN and a column called “Issue to Fix.” That column tells you if a bullet point is missing, an image fails the visual AI, or a claim breaks policy.
Tip: The new Visual Compliance AI now looks for synthetic images and overly long titles. If your title exceeds 80 characters, Amazon will hide the listing from search — see the guide from Brandwoven for the latest semantic‑search rules.
If you prefer an automated pull, you can query the SP‑API for the same suppressed‑listing feed. That way you match each ASIN with your internal DB and tag the issue for a bulk edit run.
When you double‑check the Amazon policy page for that issue, Shopkeeper notes that many sellers overlook the image‑background rule, which leads to repeated suppressions.
When you sort the spreadsheet by the ‘Issue to Fix’ column, you’ll see clusters like ‘Missing Main Image’, ‘Prohibited Claim’, or ‘Invalid Size Chart’. Tackling the biggest clusters first cuts the number of suppressed listings by half in a single day.
Now you know exactly why each ASIN is hidden. The next step is to fix the data and tell Amazon you’ve updated it.
Step 2: Review Your Product Data for Errors
Now you have the list of suppressed ASINs, it’s time to hunt down the bad data. Open the spreadsheet, sort by the “Issue to Fix” column, and look for the same mistake showing up over and over. You’ll often see missing main images, empty bullet points, or a mismatched brand name.
First, verify the SKU matches the product you meant to sell. A duplicate SKU can cause the error code 5664 – just delete the duplicate row and give the new listing a unique SKU.
Next, check the required attributes. Amazon now forces 274 attributes for 200 product types. If a field is blank, the listing gets suppressed. For a clothing item, that might be "material" or "size chart". For a toy, it could be the "age range". Fill any empty cells with the exact values from the product’s packaging or GTIN.
Quick audit checklist
- Is the brand name spelled exactly like it appears in Brand Registry?
- Do all images meet the white‑background rule?
- Are all required attributes present for the product type?
When you spot a problem, fix it right in the feed and save the row. Then run a bulk upload via the SP‑API or Seller Central’s “Upload Your Inventory File” tool. Amazon will re‑process the file within a few hours.
Tip: If you’re handling thousands of rows, a simple script that flags any empty required column can save you hours. Many teams find that running the script twice – once before the upload and once after – catches 90% of the errors.
For a deeper dive on why missing fields cause suppression, see Amazon Rufus and Conversational AI: How to Optimize Your .... It walks through the exact fields Amazon checks.
Need a fresh perspective on data hygiene? Check out this guide on photo booth rental for graduation parties. It shows how a clear checklist can keep details straight, a habit that works just as well for product listings.
Another useful resource is the photo booth rental San Diego guide, which breaks down step‑by‑step verification – a solid model for your Amazon data review.
Step 3: Resolve Policy or Content Issues
Now that you know why Amazon hid the ASIN, you need to fix the policy or content problem that triggered the alert.
Open the Policy tab in Seller Central, read the rule, and edit the offending field. If a bullet claims a medical benefit, change it to a neutral statement like “helps reduce the appearance of blemishes.”
Update any A+ or Enhanced Brand Content the same way, then save. Amazon will re‑crawl the page within a few hours.
For trademark alerts, double‑check that the brand name matches your Brand Registry entry exactly. Remove extra symbols like ™ and correct any spelling errors before resubmitting.
Tip: run a quick script that flags words Amazon flags as prohibited—such as “organic,” “guaranteed,” or “best.” Many sellers catch 80 % of risky claims before they hit the dashboard.
Back in Account Health, select the suppressed ASIN and click Submit Appeal. Note that you corrected the specific field and cite the policy you followed.
Imagine you manage a catalog of 1,200 toys and a plush doll shows a prohibited claim. You edit the description to “soft and cuddly,” upload the revised feed, and submit the appeal. The doll reappears in under 12 hours.
For a full walk‑through of common policy triggers, see the My Amazon Guy guide on suppressed listings.
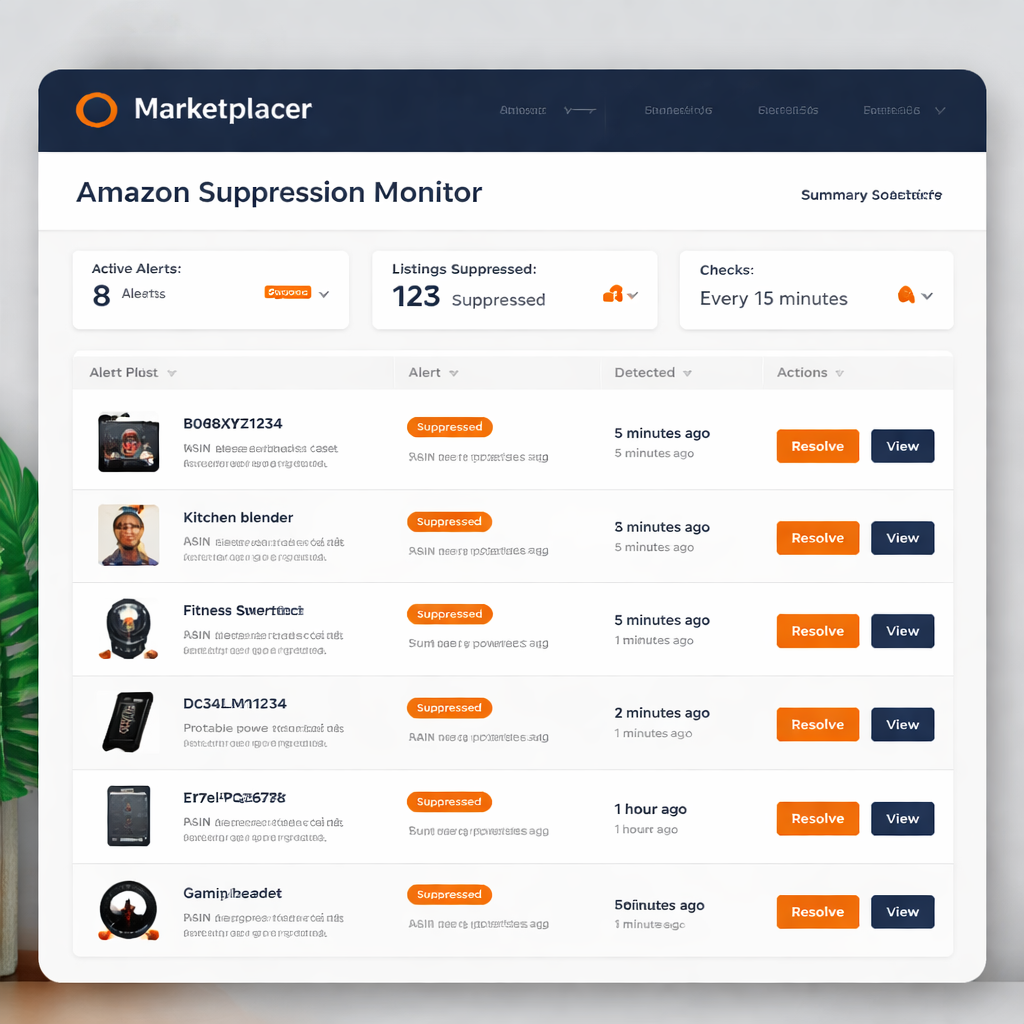
Platforms like Marketplacer let you push the corrected feed through the SP‑API in one batch, keeping large catalogs compliant without manual clicks.
Step 4: Use the Fix Listings Tool and Monitor
Now the data is clean, you need a tool that flips the switch and watches the feed. The Fix Listings Tool pulls the suppressed‑listing report, applies the edits you made, and pushes the batch back through the SP‑API.
Here’s how to run it:
- Download the latest suppressed report from Account Health.
- Map each ASIN to the corrected row in your master spreadsheet.
- Launch the Fix Listings Tool, point it at the spreadsheet, and hit "Run".
The tool logs every API call, so you can see which ASINs were accepted and which still have errors.
After the upload, set up a daily monitor. A simple script can call the GET /listings/validation endpoint and flag any new warnings. When a new alert appears, the script emails you with the ASIN, issue, and a one‑line fix suggestion.
Example: Your script spots a new "main image missing" warning on a toy ASIN. It emails you, you drop the missing image into the feed, and re‑run the Fix Listings Tool. The listing is live again in under six hours.
Tip: Keep the monitor interval short for high‑volume catalogs but longer for smaller sellers – a 30‑minute run can be overkill if you only have a few hundred SKUs.
Want to see why a continuous system beats manual fixes? Check out Amazon Listing Optimization at Scale for a deeper dive.
| Feature | What It Does | Why It Matters |
|---|---|---|
| Batch Upload | Pushes all corrected rows in one API call | Speeds up recovery from suppression |
| Error Log | Lists each ASIN that failed and why | Lets you fix issues before they stick |
| Daily Monitor | Queries Amazon for new alerts | Stops new suppressions before they cost sales |
Step 5: Prevent Future Suppressions with Ongoing Checks
Once you’ve fixed the current alerts, the real win comes from stopping the next ones before they hit your feed.
Set up a lightweight script that calls the GET /listings/validation endpoint on a schedule. The script should pull any new warnings, write the ASIN, error code and a one‑line fix note to a log, then fire off an email or Slack ping.
Pick a cadence that matches your catalog size. For a few hundred SKUs, an hourly run is fine. For thousands, run every 15 minutes so you catch issues while they’re still fresh.
When the alert lands, act fast. Drop the missing image into your feed, update the bullet, or attach the required PDF, then re‑run the Fix Listings Tool. Most listings are back in the buy box within a few hours.
Keep a simple spreadsheet that mirrors the alert log. Tag each row with “fixed”, “pending” or “re‑appeal”. This gives you a quick health snapshot and helps you spot repeat offenders.
And automate the repeat offenders. If the same attribute fails three times in a row, add a rule to your script that flags the product for deeper review. That way you invest effort where it matters.
Platforms like Marketplacer make this loop painless by offering an API‑connected monitor that writes the alerts straight to your dashboard. You get a view of new warnings, the suggested fix, and a button to push the update, all in one place.
Stick to this cycle and you’ll turn suppression from a panic button into a routine check.
FAQ
What triggers a suppressed listing on Amazon?
Amazon hides a listing when a rule is broken or required data is missing. Common triggers are blank bullet points, images that don’t meet the white‑background rule, prohibited claims, or missing compliance documents. The system flags the ASIN in the Account Health dashboard, so you can see the exact error code and reason.
How can I quickly identify which ASINs are suppressed?
Open Seller Central > Account Health > Fix Your Products. Switch the view to “Search Suppressed” and download the CSV. The file lists each ASIN and a column called “Issue to Fix.” Sort that column to see the biggest clusters first. You can also pull the same feed via the SP‑API for a programmatic match against your internal catalog.
What’s the best way to fix a missing main image?
First, locate the product in your feed. Add a JPEG that meets Amazon’s 85 % white‑background rule and meets the size guidelines. Save the row, then run a bulk upload or use the Fix Listings Tool to push the change. Amazon will re‑crawl the image within a few hours, and the suppression should lift.
How do I submit an appeal after I update the data?
Go back to the suppressed ASIN in Account Health, click “Submit Appeal,” and write a short note. Mention the exact field you corrected and reference the policy you followed. Keep the note under 150 words, use plain language, and attach any required PDF if the issue was a compliance document. Then hit submit.
Can I automate the monitoring of new suppression alerts?
Yes. Set up a lightweight script that calls the GET /listings/validation endpoint on a schedule that fits your catalog size. Have the script write the ASIN, error code, and a one‑line fix tip to a log file, then email or Slack you the details. A 15‑minute interval works for large inventories; an hourly run is fine for smaller ones.
What should I do if the same issue keeps coming back?
If an attribute fails three times in a row, add a rule to your script that flags the product for deeper review. Check the root cause – maybe the image file is corrupt or the claim still contains a banned phrase. Fix the root, then re‑run the bulk upload. Over time the repeat alerts drop off.
Conclusion
Fixing suppressed listings isn’t a one‑off task. It’s a loop of spotting alerts, correcting data, and confirming the change. If you follow the steps you’ve just read, you’ll stop losing sales the moment a badge appears.
Remember to keep a log of each fix and set a script to pull new alerts. That way you catch repeat issues before they snowball. A quick note in the appeal that cites the exact field you changed speeds up Amazon’s review.
For large catalogs, a continuous platform that ties the SP‑API to your own data can shave hours off the cycle. Platforms like Marketplacer give you that API‑connected, data‑driven workflow.
So, what’s next? Pull today’s suppression report, fix the top three reasons, and fire off the appeals. Keep the monitor running and you’ll turn panic into routine.
Over time the pattern you build will keep your catalog visible and your buy box healthy.
Want this done for your catalogue automatically?
Get a free catalogue scan